Category Archives: Arms

Steyr AUG NATO conversion

You may have a big collection of AR-15 magazines.  Or maybe you don’t want to spend upwards of $40 apiece to build a collection of Steyr magazines that will only work with your AUG. In either case the Steyr NATO stock is a welcome option.  I bought a conversion kit, which consists of a modified stock and trigger pack (a.k.a. “hammer group”), from CDNN for $300.

Top: Original AUG stock, trigger pack, and magazine. Bottom: NATO conversion kit, shown with an L5 magazine.
Steyr AUG NATO Conversion

Shown here (top) is the original AUG/A3 stock and trigger pack and (bottom) the NATO Conversion stock and trigger pack, with Lancer’s transparent L5 AR-15 magazine. Like all AUG stocks the NATO stock is molded with a bump on the top receiver end. To accommodate the A3 receiver’s extended top rail this stock bump has to be cut down — an operation I was able to complete in just a few minutes with the careful use of a belt sander.

The trigger packs are identical except for a spring-loaded tab on the AUG pack that locks into the rear of their proprietary magazine. Because AR-15 magazines are designed for side latches the NATO stock has several differences from the standard stock:

  1. There is no bolt release. The only way to get the bolt forward after it locks back on an empty magazine is to use the cocking slide on the front of the gun.
  2. Only the right-side trigger bar reaches all the way to the trigger pack. The other is cut off somewhere before the magazine well.
  3. It has a magazine release button, which is actuated by the standard AUG mag release lever. The button is flush with the stock so it probably wasn’t designed to be used directly, but from a shooting posture it is easier to push than the lever behind the magazine.
  4. It can’t be adapted to left-hand ejection. Where the standard stock has a rubber cover over a left-hand port the NATO stock is molded solid.
Top: AUG Magazine. Bottom: L5 magazine.

For comparison purposes I have used L5 magazines on the NATO conversion. These cost $13 vs. at least $39 for Steyr’s 30-round AUG magazines. The L5 plastic shell is much thinner than Steyr’s uniformly thick body, but it has metal feed lips and a rubber base to help it survive drops.

My NATO conversion kit had a sticky trigger in addition to an even heavier trigger spring than normal, resulting in a out-of-the-box trigger weight of over 12 pounds (in contrast to the standard AUG trigger of “only” 9 pounds)! Fortunately Steyr has agreed to look at this. I will post details on fixing and improving the trigger soon.

[Update: Steyr’s Alabama technical services group took just two weeks to fix this up beautifully. Now the stock’s trigger is smooth and the sear spring breaks right at 9 pounds. Of course, a 9-pound trigger is still nothing to brag about. See also my post on AUG and MSAR Trigger Improvements.]

Steyr AUG/A3 USA

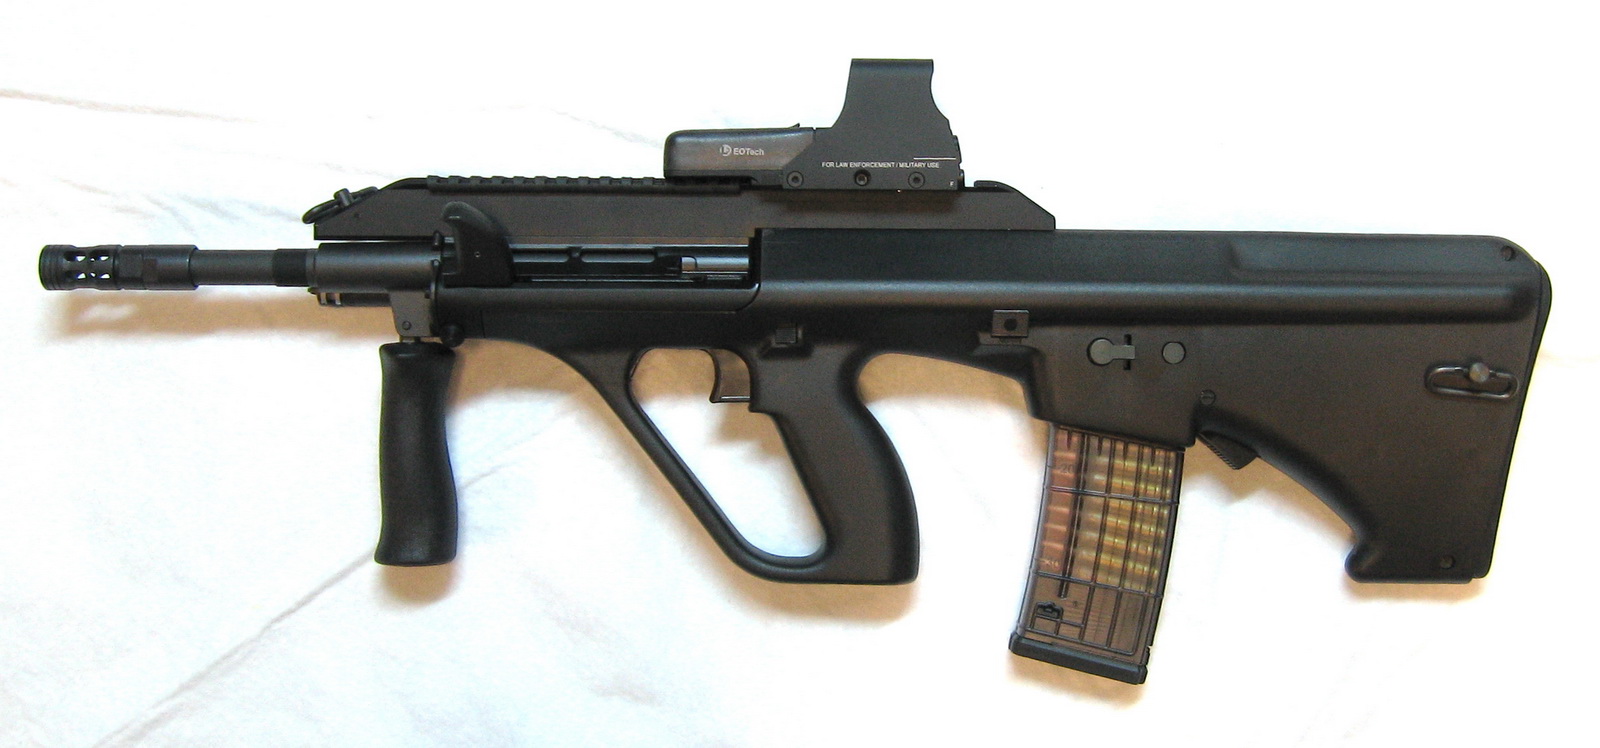
This is my Steyr AUG/A3 SA USA, with a NATO conversion kit (covered in this separate review), and sporting an EOTech 512 sight.  The AUG/A3 is the latest version of an Austrian 5.56mm tactical bullpup carbine, first produced more than 30 years ago, that is used by police and military units around the world.

Bullpup firearms have always struck me as a great — even obvious — idea:  After all, why cantilever the entire barrel and action forward of the trigger, using the foot or more of stock between the grip and butt for nothing more than a cheek rest?  Moving the action behind the trigger gives a much more compact and balanced weapon for a given barrel length.

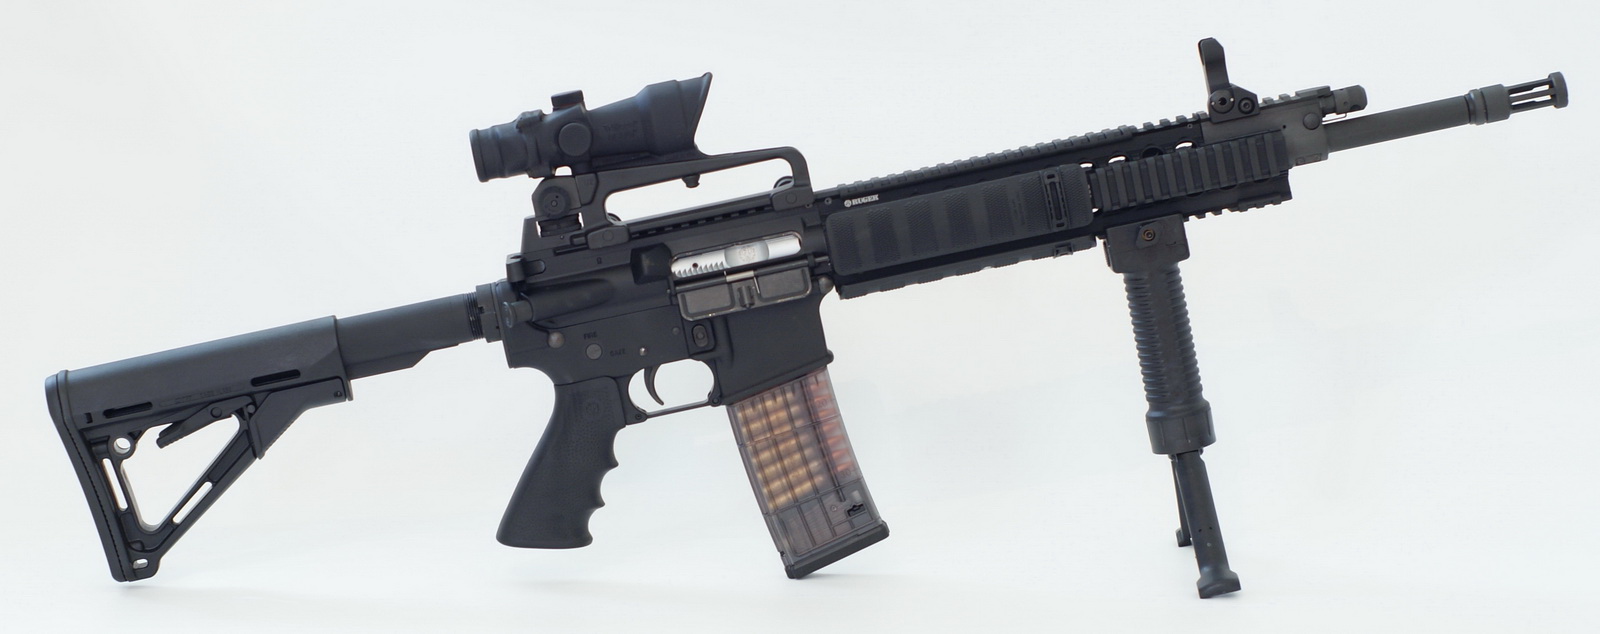
The NFA gives us an extra incentive to pursue bullpups:  Since unregistered firearms with stocks have to carry barrels of at least 16″, a standard rifle design is going to far exceed the minimum overall length (from butt of the stock to end of the barrel) of 26″:  An AR-15 with a 16″ barrel and a 12″ length-of-pull is 36″ long.  The AUG, with the same barrel and length-of-pull, comes in at just over 28″.

Of course there are some complications in the execution.  The most significant for autoloading guns is where to throw fired cases.  The FN P90, a pistol-caliber bullpup PDW, can eject straight downward because its magazine sits on top of the gun.  But when the magazine is inserted underneath the action that path is blocked.  FN’s F2000 and Kel-Tec’s RFB actually eject the cases forward into a chute that eventually drops them in front of the gun’s body.  Like the SA-80, TAR-21, and FAMAS (also military bullpup rifles, but ones that are not currently available in the U.S.), the AUG uses a conventional side-ejection action.

Some people are fazed by the fact that the ejection port is just opposite the shooter’s head when the gun is shouldered. Having already put a few hundred rounds through mine I can attest that you won’t even notice.  A religious tactician might complain that this gun can’t be shot cross-shoulder.  You definitely would not want to fire it from the left shoulder (unless you like eating hot brass) but when tactics require it the gun can be thrust forward and fired from the left-hand side — particularly effectively when equipped with a good holographic sight.

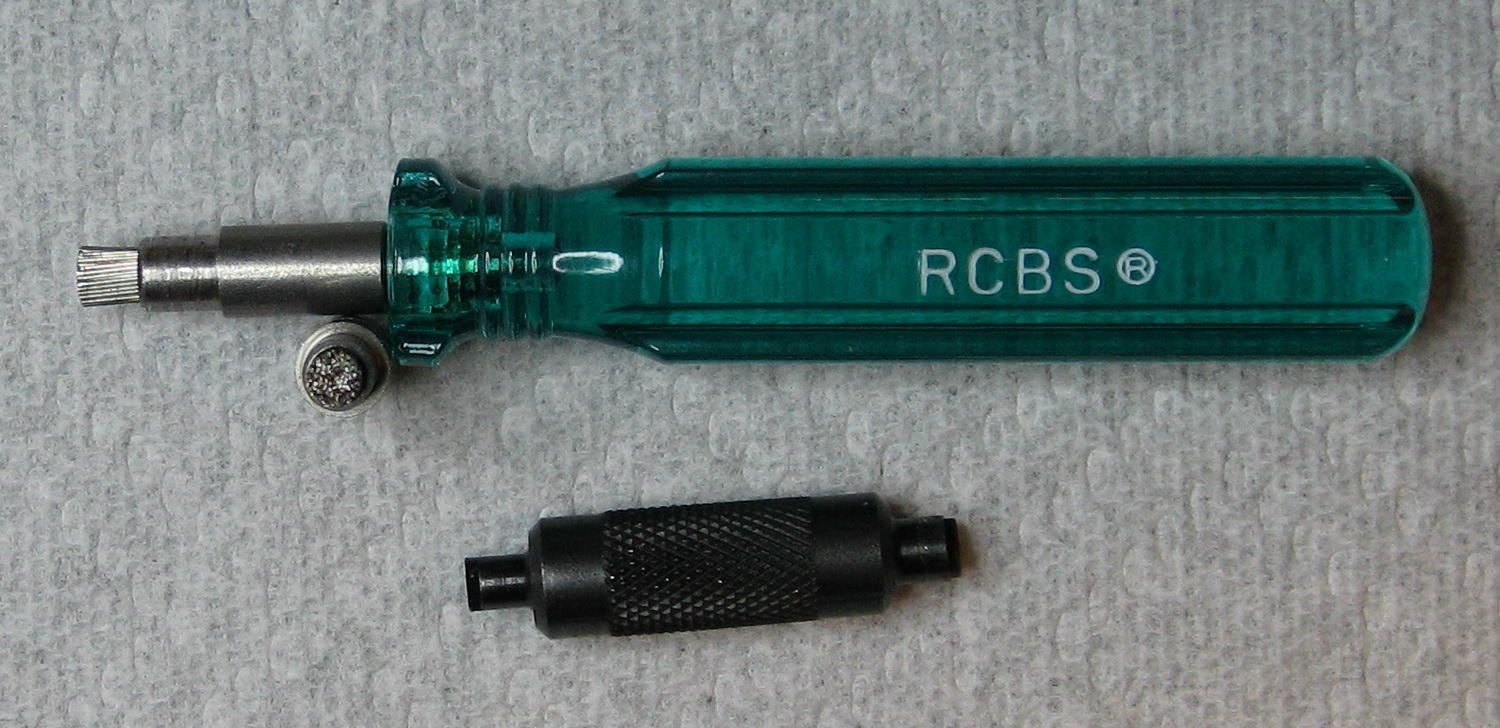
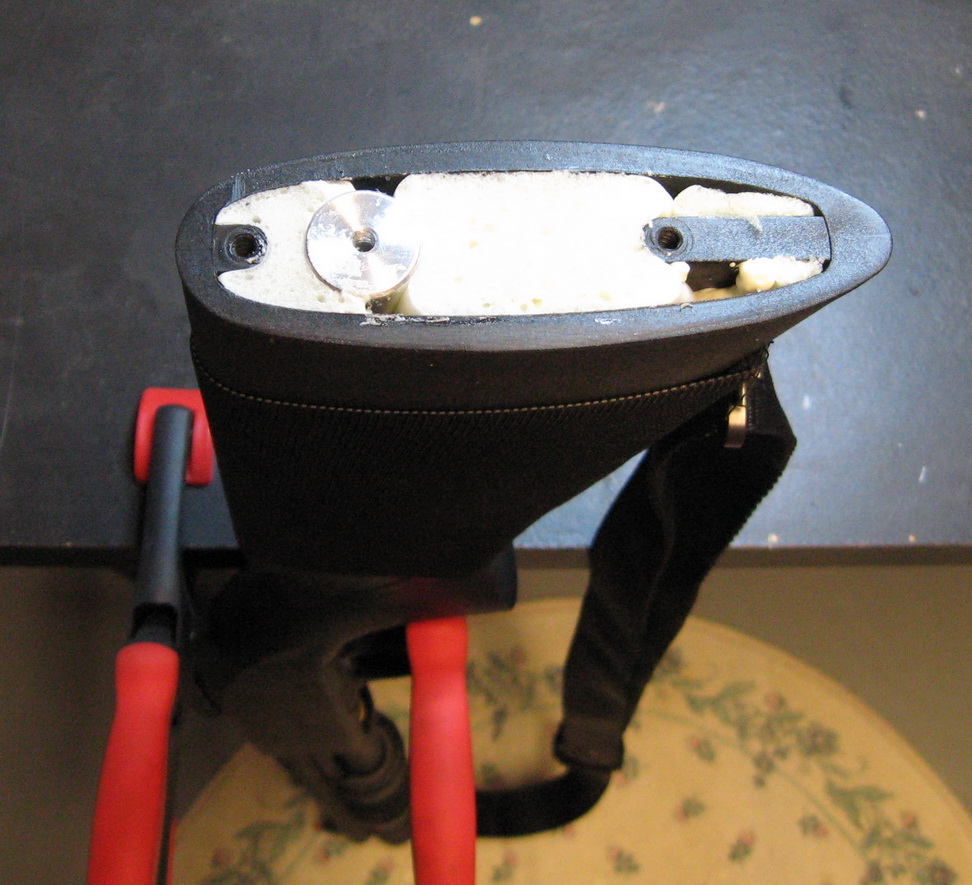
In 1989 the federal government decided to apply a provision of the GCA to ban the importation of a number of foreign-made “assault rifles,” including Steyr’s AUG.  A few thousand AUGs that had been imported prior to that date became collector items that traded for $3-4k apiece.  After the 1994 Assault Weapons Ban expired in 2004 two domestic companies began to develop AUG clones: TPD’s AXR and MSAR’s STG.  Soon Steyr decided to join the action by teaming with Sabre Defense to assemble bona fide Steyr AUG’s domestically to serve the U.S. market.  These began shipping in 2009 as the Steyr AUG/A3 SA USA to indicate that they are Semi-Auto A3 variants assembled in the USA. (Their serial numbers all include “USA.”)  In September I discovered the price had fallen below $1900 so I promptly grabbed one at a gun show.  The complete AUG USA package includes a chrome-lined 16″ 1:9 barrel, two magazines, a soft case, sling, and a cleaning kit that fits in the rear of the stock.

According to Steyr the majority of the AUG USA’s components are made in Austria.  Of the 12 components made in the US the two major ones are the stock and the barrel assembly.  All other parts are imported and undergo final assembly by Sabre Defense.

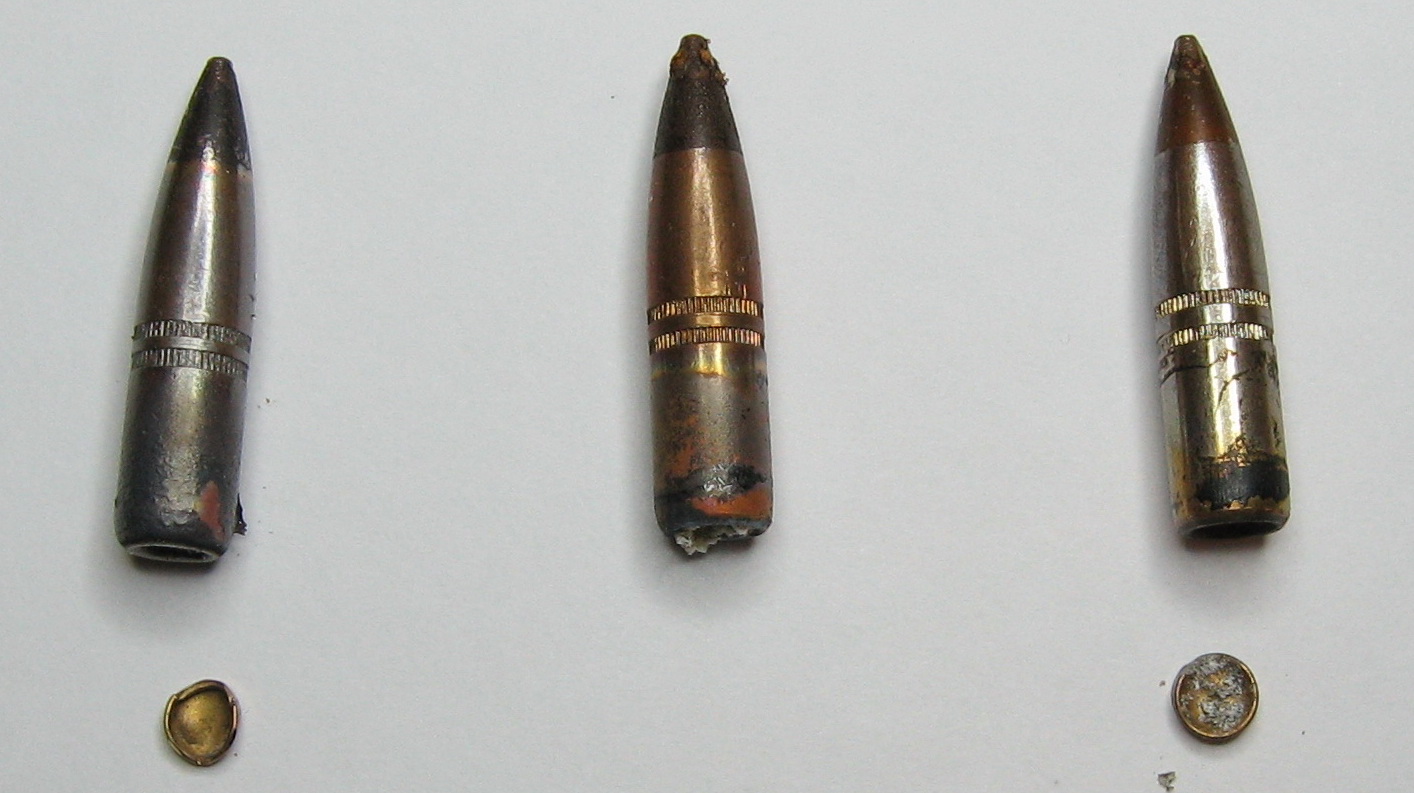
One unfortunate specification being preserved in the AUG USA is the European M13x1 muzzle threading.  Ratworx sells a thread adaptor for the 1/2×28 threading used by suppressors here, and Steyr said they are also working on releasing one. I suggested to Steyr that they instead work on a 1:7 twist 16″ barrel with 1/2×28 threads for this market since most tactical shooters now prefer heavier bullets that require tighter rifling, and we would then have two reasons to buy a new barrel group!

The A3 variant comes with a nice main rail for sights and a small forward rail at 1:30, which would be great for a laser or light. One drawback of the main rail is that it sits awfully close to the charging handle (a.k.a. “cocking slide”). The manual repeatedly instructs the user to operate the slide with an upward-facing palm to avoid scraping knuckles against the corners of the rail. I simply capped my unused rails with low-profile rubber Falcon covers ($2/6″ from Botach) and this is no longer an issue.


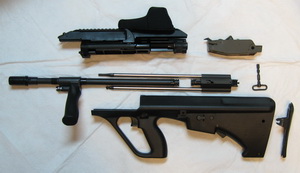
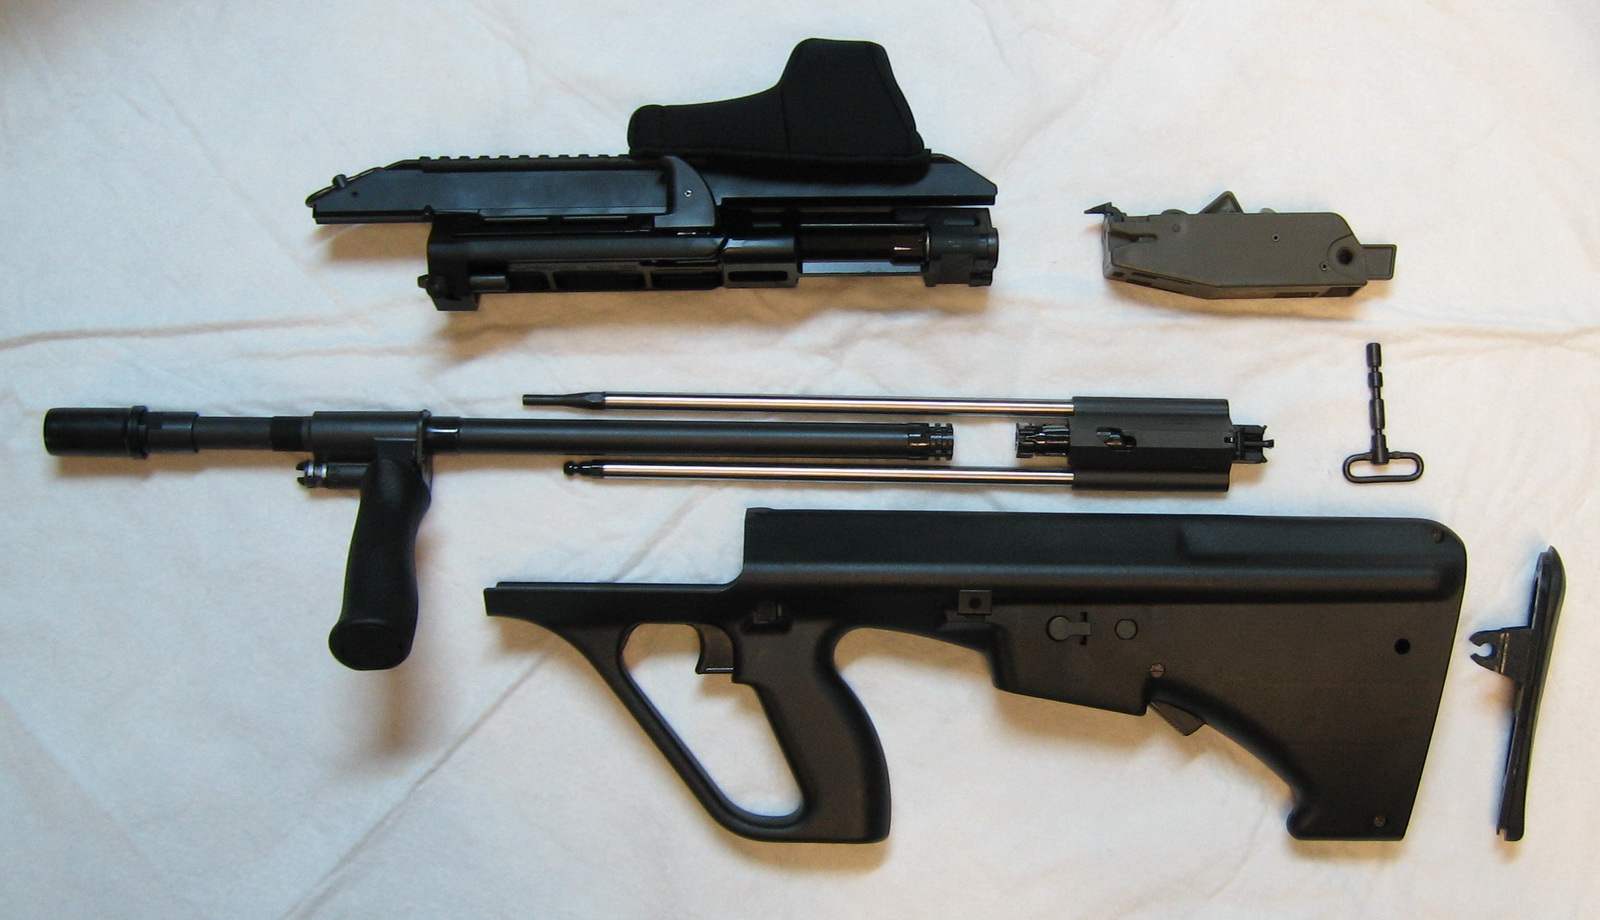
The AUG features an ingenious modular design. With no tools it quickly breaks down into 5 component groups shown here: Barrel, receiver, bolt carrier, stock, and trigger pack. (The butt pad and stock pin have been removed from the stock group as part of the take-down procedure.)

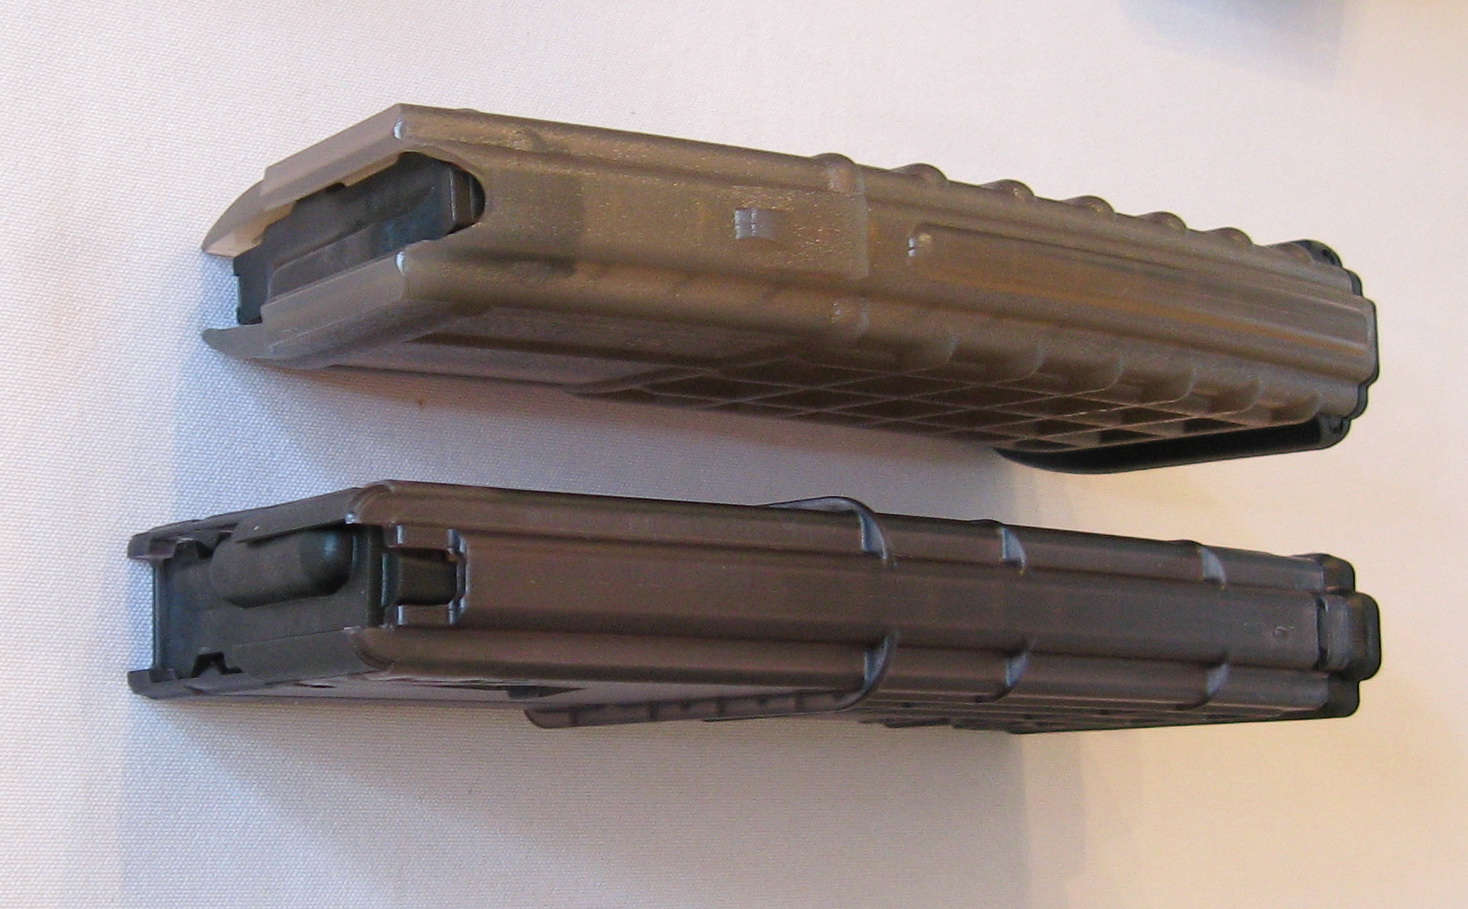
I was always enamored of the AUG because it was a beautiful and clever bullpup, and I am even more drawn to it since I have sworn off direct gas impingement actions (because they’re too hard to keep as clean as I like my guns): The AUG uses a two-position gas piston, so all the carbon fouling is limited to a small regulator, piston, and spring next to the front handle on the barrel assembly.

About that trigger…

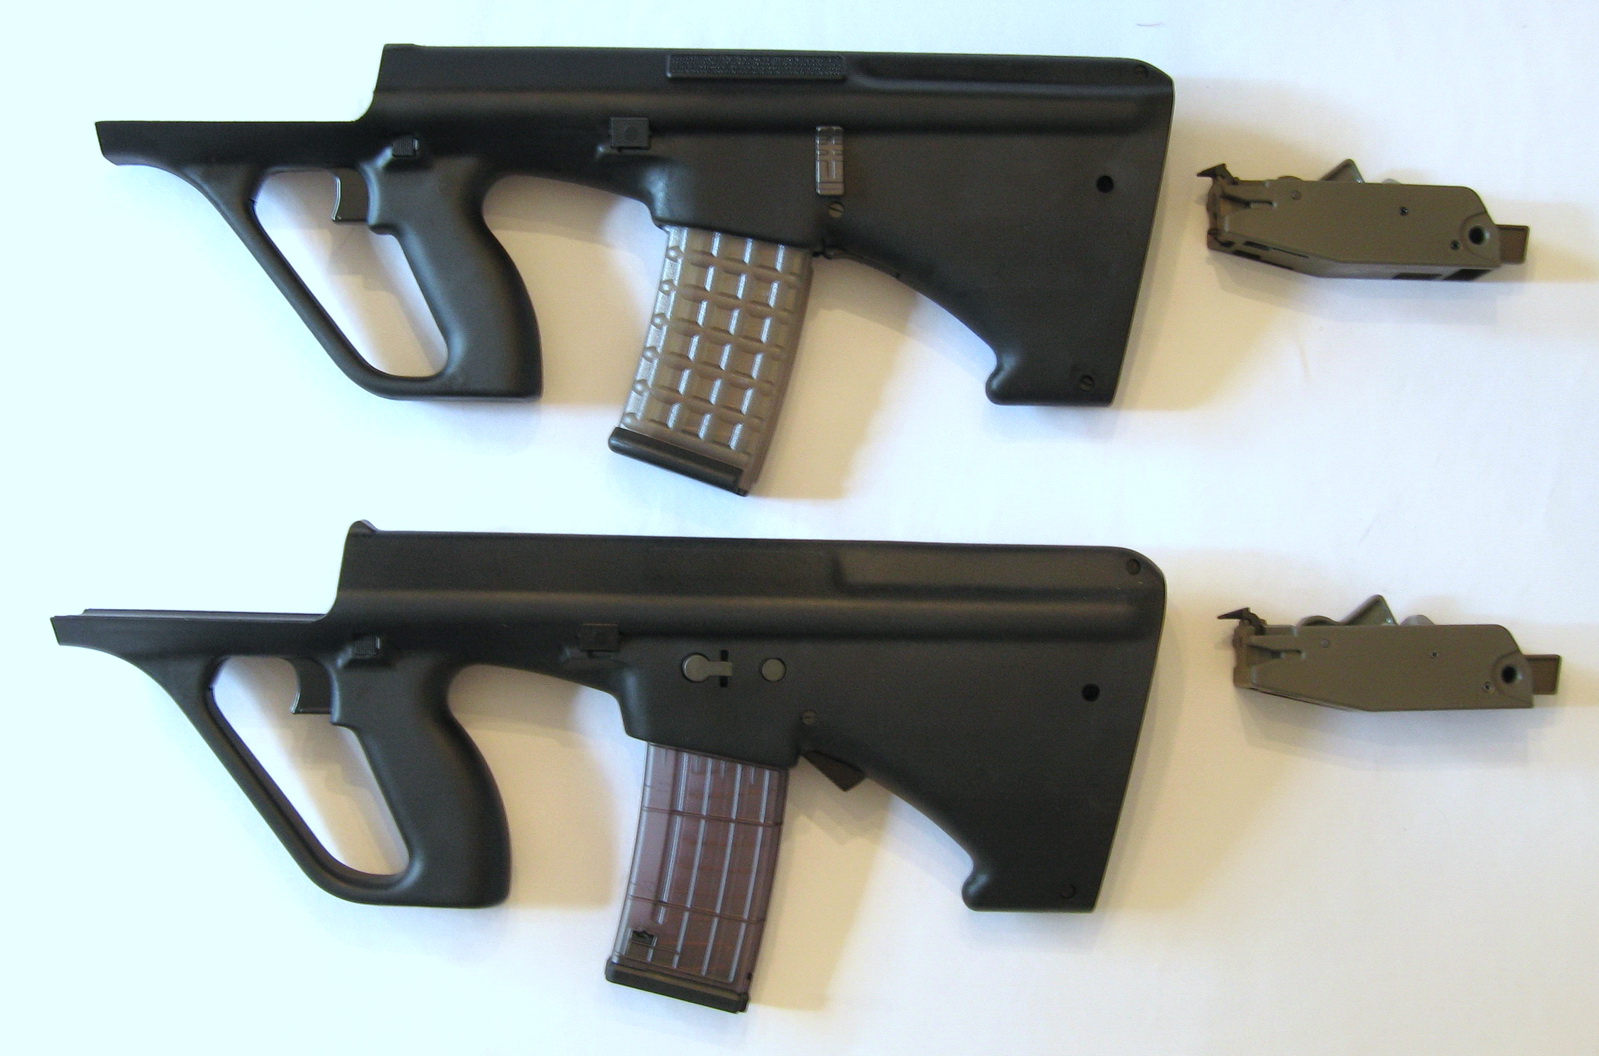
The AUG trigger is notoriously bad, with a typical out-of-the-box pull weight of 9 pounds!  Contrary to some conjectures this is not a problem intrinsic to bullpup configurations.  Having studied the trigger pack I don’t believe it is even a consequence of constructing the sear and hammer out of plastic(!), although that may be an impediment to achieving a truly match-grade trigger.  Steyr has simply constructed this gun with a trigger spring far heavier than necessary.  This is probably a holdover from their original two-stage select-fire trigger system, which uses a partial trigger pull to discharge a single shot and delivers full-auto bursts with the trigger pulled fully to the rear.

For semi-auto AUG’s the trigger spring can be safely and significantly lightened.  But at present the only aftermarket part available to do so is the TriggerTamer: A patented plastic piece that replaces the rear tab on the trigger pack to engage the trigger spring at a slightly less compressed angle, resulting in a one-third reduction in trigger weight. [Update: See my post on AUG Trigger Improvements.]

Sight

EOTech 512
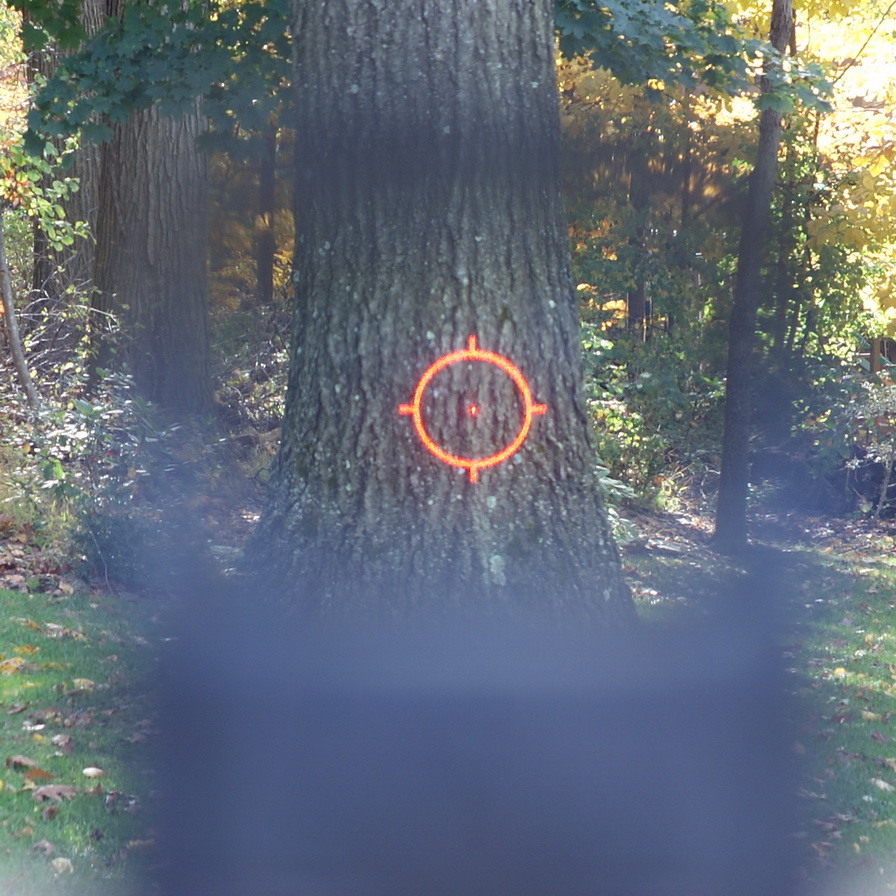
With the combination of its compactness and heavy trigger the AUG is ideally suited to CQB or the emerging “Personal Defense Weapon” (PDW) roles.  Given the difficulty of triggering precision shots I think a magnified optic would be poorly suited to this gun.  The ideal sight is a holographic red-dot, which gives the shooter the widest field of view and greatest ease of sight acquisition because one’s head does not have to be aligned with the sight: If you can see the dot anywhere in the sight window, it’s covering the point of impact.  I ponied up $350 for an EOTech 512 from Botach.  This sight combines proven military ruggedness with my favorite red-dot reticle: A large 65 MOA circle for fast targeting and a 1 MOA center dot for more precise sighting.  Many other red-dot sights have larger center dots, which cover too much of a target for precise shots at longer distances.

Current Market

With the Obama-fueled gun-buying spree winding down and the economy bottoming out gun inventories are starting to climb. Apparently Steyr is now releasing the A3 to distributors for $1750. Meanwhile MSAR has dropped the wholesale price on its STG to $1050. MSAR is also doing some clever things with their fourth-generation (“E4”) models, including standard NATO magazine compatibility and multiple calibers. Steyr will probably not be able to keep up with MSAR’s innovations because the AUG USA is a tiny portion of their business, and also because they are very wary of crossing any lines with the ATF.

Tactical Rifle: Ruger SR-556

The last time I wrote about the AR-15 rifle platform my biggest design complaint was the Direct Gas Impingement (DGI) action.  This has been a feature since the very first generation of the weapon adopted by the military over 45 years ago.  DGI contributes to the platform’s simplicity and lightness, but also has some undesirable consequences: Every time the gun fires it blasts hot propellant gasses back into the bolt carrier, baking a layer of carbon onto everything in the receiver.  Decades of military service have proven that well-made AR-15’s can withstand this abuse and continue to function reliably with just basic cleaning and lubrication.  But for obsessive owners who like to keep their guns in more immaculate condition this dirty design can be quite irritating.

When I bought my first AR-15 following the 2004 expiration of the federal “Assault Weapons” Ban I openly wondered why no manufacturer had produced a piston-driven variant of the gun, especially given the huge market for America’s favorite tactical rifle.  Since then I tracked the gradual emergence of AR-15 piston actions, first as retrofit kits, then as new uppers and complete guns.  There was a great deal of concern about the long-term reliability of converted actions, mostly because the AR-15 bolt carrier wasn’t designed to be hammered with a piston, and its geometry seemed prone to an adverse effect called “bolt carrier tilt.”  Some manufacturers, most notably LWRC, built a new action from scratch to mitigate these concerns.  However LWRC’s piston uppers were always very hard to acquire, and even today they command huge premiums.

In mid 2009 Ruger entered the AR-15 market for the first time, and they did so with a proprietary piston action.  The SR-556 now represents the best value in piston-driven AR-15s.  I sold my old DGI AR-15 to somebody less fastidious than me and last month managed to pick up a new SR-556 for just under $1500.

The SR-556 comes standard with a number of desirable upgrades over basic AR-15s.  Among them:

  • Full-length quad-rail handguards, so you can easily add as many accessories as you can carry.
  • Top-quality folding iron sights (by Troy Industries).
  • A comfortable pistol grip (by Hogue).
  • Chrome-plated bolt carrier assembly, so what little dirt does get into the action can easily be wiped off.

The piston system was executed superbly.  Only the three pieces in the front two inches need to be removed for cleaning.  The piston regulator has four positions.  In the off position the action doesn’t cycle, essentially giving you a bolt-action gun.  The first position (smallest gas opening) is suited to use with silencers, which sustain more backpressure on the action.  The second position cycles the action reliably under normal conditions, and the largest opening can be used to compensate for weak ammunition, a very dirty gun, or other harsh conditions.

Shooting the gun for the first time was a pleasure.  There were absolutely no malfuctions.  Even after sustained firing the bolt was cool to the touch (though the barrel and gas vent area still got quite hot!).  Long-term reliability on a new design may not be certain, but the fact that Ruger is comfortable enough to roll these out in quantity is reassuring.  This should certainly outlast piston systems that use DGI bolt carriers with their separate gas key: The SR-556 carrier is machined from a single piece of steel with just a little hump over the main tube to take the impact of the piston.

Out of the box this is a very good gun, but it does have a few shortcomings:

  • Like all piston guns this is both front-heavy and heavier (just under 8 pounds) than comparable DGI AR-15s (typically closer to 7 pounds).  Of course even professional users of the DGI M4s have found it beneficial to put a vertical grip on the front of their guns.  I added a GripPod ($80 from Botach) and found this mitigates the imbalance nicely, in addition to deploying a handy bipod when desired.
  • The flash suppressor has uniform slots around its entire diameter.  When shooting prone or on a table this causes some of the muzzle blast to kick up dust.  Although closed-bottom flash suppressors require indexing to install, this should be a trivial factor to accommodate on a production line.  So shame on Ruger for not equipping this with a closed-bottom flash suppressor!
  • The telescoping buttstock is a standard M4 style, which leaves a lot of play between the stock and the buffer tube.  They should have just equipped it from the start with a Magpul CTR (shown in the photo above), for which I had to pay another $80. (To fit this gun be sure to get the mil-spec, not commercial size CTR!)
  • It doesn’t come with a front sling loop or swivel.

M25 and M62 .30 caliber Tracer Bullets

As a new handloader I thought it would be fun to add tracers to my inventory. Tracer bullets that have been pulled from surplus military ammunition can be picked up for $15/100 at gun shows or online.

I bought one bag each of M25 and M62 tracers, but since I couldn’t find any detailed information about them online I decided to analyze them myself. Ten of each are shown here, M62’s on the left. Both tracer types are marked with an orange tip. (The black residue on the bottom of the bullets is the remnant of sealant used on military ammo and comes off after a spin in a vibratory cleaner.)
MilSurpTracerBullets
MilSurpTracerBulletBases

M62 tracers are designed for .308 (7.62x51mm NATO) rifles. Overall length is 1.33″, and they have a single .05″ cannelure which leaves a bearing length of roughly .60″.

BulletSectionsM25 tracers were supposedly designed for .30-06 rifles. They are nearly identical to the M62’s except for a second cannelure that allows them to be crimped more deeply in a case. This photo shows whole and sectioned samples of M62, M25, and (for comparison) 168gr BTHP bullets.

TracerCompoundUnderBaseCupI weighed the M62’s at about 143 grains and the M25’s at about 145 grains. On both bullets the base of the copper jacket is crimped around a 1 grain copper cup about .20″ in diameter. The cup is seated almost .1″ deep from the base of the bullet on M62’s, and slightly more shallow on the M25’s — .06-.08″ from the base, which could account for the extra weight on the M25’s given that the overall length on both is the same. Ahead of the cup, and behind the lead core, is .40″ of tracer compound with a dimple in the center, shown here.

The tracer compound is brittle and powdery, and weighs only about 10 grains. It burns with a bright red flame for about 4.5 seconds and (in static tests at least) leaves behind 3-4 grains of ash.

In order to help conceal a shooter’s location these tracers are designed to not fully light up for the first 100 yards of flight. At muzzle velocities over 3000fps that’s just a tenth of a second from firing to the appearance of the full flame. I did a number of tests to try to determine the tracer compound’s ignition temperature as well as the mechanism by which this delay is achieved, but was unable to get consistent results.

First I took a tiny amount of tracer powder and put it directly on a thin nichrome wire linked to a dimmer switch and a thermocouple. I slowly raised the temperature to 900F but nothing happened. I shut down and then rapidly hit the heater with full current and got an immediate ignition. In later tests I opened the back of a tracer and put the compound in direct contact with a thick copper wire heated to 800F and still got no ignition!

In an attempt to more accurately simulate the conditions of being pushed from behind by the hot gases in a firearm I took an intact bullet and anchored its base directly to the top of a copper wire, which I slowly heated with a propane torch. It reached 540F and after some time at that temperature the entire tracer pellet ignited and ejected out of the back of the bullet, pushing the bullet 5 feet into the air and leaving the copper cup still on the test stand. That’s not what’s supposed to happen either, but it does suggest a potential failure mode: If the tracer compound ignites from anything other than its base a shooter will see a red flash and then nothing as the compound leaves the bullet and burns much faster dispersed in the air. This also confirms (as did later tests) that the tracer compound provides negligible thrust — in this extreme case accelerating the bullet less than 10fps.

[Update: Though they don’t significantly propel the bullet, burning tracers do extend the bullet’s range. In a summary of BRL research on .50 caliber bullets Robert McCoy notes, “The tracer adds heat and mass flux into the wake, which raises the base pressure and lowers the base drag. For the APIT, M20 projectile, the tracer reduces the total zero-yaw drag coefficient by approximately 7 percent, at all speeds tested.”]

Fortunately, it’s not hard to get a proper ignition of these tracers: Hitting them briefly with a propane flame will reliably ignite them, as shown in this video. Here is a photo of three burned tracers along with two of the recovered base cups.

Primer Pocket Cleaners: Lee vs RCBS

Cleaning primer pockets of fired cases is part of the ritual of preparing accurate, reliable reloads.

RCBS sells a $15 Primer Pocket Brush Combo (Part #9574) for this purpose, consisting of a threaded handle and two threaded stainless steel wire brushes for each primer pocket size.  It is the first tool in the following photo:

The second tool shown is Lee’s $2 Primer Pocket Cleaner (Part #90101).  It is just a small blued steel cylinder with a squared-off blade on one side for small primer pockets and on the other side for large ones.

The following picture shows eight large-primer cases.  The left two have not been cleaned, showing the importance of this step of brass preparation.  The top three were cleaned with two twists of the RCBS tool, and the bottom three with two twists of the Lee tool.  I thought the RCBS would be more comfortable and easy to use, but after prepping a batch of brass I became much more concerned about what it was doing to my primer pockets:  As you can see the steel brushes leave noticeable gouges in the brass.  In contrast, the Lee tool keeps the pocket face square and relatively unscathed.

I can’t see any good coming of marring primer pockets to this degree.  Especially over repeated uses the RCBS brush is removing measurable amounts of brass, and if you didn’t need it the first time it will almost certainly be needed on subsequent cleanings since the primer pocket floor is no longer flat enough for a tool like Lee’s to make full contact.  Therefore I recommend against the RCBS tool. Lee’s much cheaper tool is a perfectly functional solution to primer pocket cleaning.

Recoil Reduction Products

I own two over-under field shotguns.  These are light guns optimized for carrying on long walks hunting birds.  But a lighter gun means heavier recoil.  I like to take my field guns trap shooting, but it can be painful to shoot more than a few rounds with 12-gauge or even 20-gauge loads.

Competitive shooters with customized guns and release triggers laugh at the idea of using field guns for sporting clays.  “If you want less recoil you have to add more weight to the gun,” they insist.  Adding weight is certainly one way to dampen recoil.  But I’m a practical guy and I don’t want to turn my light field guns into heavy competition guns.

Fortunately there are other ways to control recoil:

  1. Fit.  This is the primary factor affecting the shooting experience of a bird gun.  If the gun doesn’t fit the shooter then the shooter won’t be able to maintain a correct shooting posture: Cheek “welded” to the stock, butt snugly in the shoulder pocket, and dominant eye aligned with the front sight bead.  If you can’t lock the gun against your cheek and shoulder then the recoil of every shot will slap you (often leaving visible bruises).  If your eye isn’t aligned with the sight then you will probably miss the target.  (The shooter’s eye serves as the rear sight on a bird gun.  It doesn’t take much sight movement to change the point of impact at 20-40 yards!)
  2. Action.  A semiautomatic action will absorb a significant amount of recoil.  Of course that doesn’t help if you’re talking about making a bolt or break action easier to shoot.
  3. Dampers.  You can dissipate recoil energy using damping mechanisms.  Almost every gun comes with a rudimentary damper in the form of a rubber recoil butt pad.  Here I review some more advanced dampers.

Edwards Recoil Reducer

Edwards Recoil Reducers are light cylinders containing a spring-buffered counterweight that absorbs and even redirects (depending on installation angle) recoil.  I got one delivered from Brownells for $60.  It looks and feels like a rugged device.  Edwards has been making these for over forty years and backs each reducer with a lifetime warranty.

Installation in a wooden stock can be a bit of a project.  Take the recoil pad off of any shotgun and you’ll discover a lot of empty space in the stock.  Before you can properly install the reducer you probably need to fill that space with some combination of dowels or other wood trimmed for a tight fit.  Then with a 7/8″ forstner bit you can carefully drill out a hole as high and parallel to the gun’s barrel as possible.  Push the recoil reducer into the hole, make sure it’s snug, and screw the recoil pad back on to hold it in place.

Installation in a hollow plastic stock is simply a matter of unscrewing the recoil pad, positioning the reducer, and filling the remaining space with sprayfoam, as shown here.

After installing the Edwards Recoil Reducer in one of my guns I took it right back to the trap field — still sore from shooting four rounds two days earlier.  The recoil reduction was immediately obvious.  I’m still working on a recoil gauge to quantify peak forces, but to me it felt like close to half of the recoil was gone.  Even after four more rounds with the gun I would have been comfortable continuing to shoot.

Graco GraCoil

Graco’s GraCoil is a butt plate that contains an adjustable piston that compresses up to 5/16″ to absorb recoil.  Compression damping is also what a good recoil pad is supposed to do, but pads aren’t adjustable and they can’t get too mushy before they impact handling.  The GraCoil spring can be tightened just enough that it doesn’t move under the pressure of your shooting stance, but then immediately starts to compress to absorb the recoil of a shot.

GraCoil plates also include a mechanism to enable significant adjustment to the position of the butt pad.  This allows for significant improvements in the fit of a shotgun (which, as noted above, is an essential feature!).  I opted to buy the GraCoil Model GC15-LP which also includes a length-of-pull adjustment.

The GraCoil needs to be ground to fit a particular stock, something I didn’t feel like attempting.  Total cost of the GC15LP with factory installation is $375.  MPC Sports will sell and install the same unit for $325.  I went with the latter vendor.  I carefully reviewed the proposed work with their gunsmith over Email and then mailed my stock to their shop in Atlanta.  The completed piece was back in my hands just a week after they received it.

After tweaking the tension on the piston and getting the butt pad in just the right place shooting with the GraCoil is so easy and natural I really could break clays all day long.

FrontSight Nevada Firearms Training

Outside of the military, I have taken commercial firearms training courses at both the SIGARMS Academy in New Hampshire (now called the SIG SAUER Academy) and at FrontSight in Nevada.

My experience at SIG consisted of a 3-day Concealed Carry Pistol course.  They have a great indoor range where they shoot only lead-free frangible ammo, which means you can get up close with the reactive metal targets.

At FrontSight you generally have to contend with outdoor courses where you are exposed to all of the rigors of weather in the Nevada desert.  In return you get access to some very long ranges and simulators.  My first experience at FrontSight began with a promotional half-day submachine gun course.  Subsequently I have done one-day assault rifle and shotgun courses, as well as a two-day practical rifle course.  In every case I drove up each day from Las Vegas.  My best experience was with the one-day courses, which you can custom schedule almost anytime one of the longer courses isn’t in session: My wife and I had an instructor and a range to ourselves, and all ammunition was provided.  List prices for Front Sight can seem very high, but the institute’s director, Ignatius Piazza, is constantly running promotions so I would be surprised if anyone pays full tuition.  You can usually find discounted course “certificates” that cover tuition on Ebay.

The single most important variable in your experience at either institute will be your instructor.  On the whole I have been quite satisfied, though not every instructor is equally engaging or capable of adapting the content and pace of instruction to the students.  Both institutions keep a decent instructor/student ratio, so incompetent students tend not to bog things down.  One other thing you have to deal with at Front Sight is Ignatius Piazza’s cult of personality: Classroom time will include details of his personal philosophies as well as extended pitches for you to buy Front Sight membership and more courses.

CMC AR-15 Super Match Trigger Group

A typical AR-15 does not have a good trigger: My Bushmaster’s factory trigger is heavy and not particularly crisp.  I finally broke down and bought a single-stage Chip McCormick trigger group for $176.  The advantage of this over other match triggers designed for AR-15’s is that it’s a single rugged unit, easy to install, with a 3.5-pound pull that breaks like glass.  Drawback compared to its competitors is that it is not in any way adjustable.

Freebore Boost Effects

When I first took my .223 suppressor (Gemtech M4-02) to the range with a chronograph I was surprised, on reviewing the data, to find that it was doubling the standard deviation of muzzle velocity. Baffle suppressors are known to increase muzzle velocity in an effect known as “freebore boost.” Basically they extend the barrel length, which gives the propellant extra time to accelerate the bullet. So I was expecting to see higher velocities, but not higher variance: When I added the can to the end of the barrel average velocity went up about 50fps, but the standard deviation of velocity also went from about 22fps to 45fps!

When it comes to marksmanship anything that increases variance reduces accuracy. Are suppressors inherently bad for accuracy? After some correspondence on the SilencerTalk.com forum I decided to run a controlled experiment. I went back to the range with a stopwatch and a Mastercool infrared thermometer.

Muzzle Velocity versus Suppressor Temperature

What I found is that muzzle velocity is strongly correlated (R2 = .60) with suppressor temperature. I.e., once your can is hot your bullets will go faster. Several people hypothesized that this is simply because hot air is less dense, so it offers less resistance to the accelerating bullet. Another hypothesis is that the propellant burns more completely or more rapidly in the superheated air it encounters in the baffles, which increases the rate at which it can propel the bullet.

How hot does a suppressor get? For this experiment I shot Federal XM193 5.56mm (55gr Boat-tail ball) ammunition. On average each shot heated the 16 ounce suppressor by 10 degrees F. During one phase of the experiment I shot 30 rounds in under 90 seconds, which raised the suppressor temperature from 110 to 410 degrees F. During that extended string of shots my standard deviation was only 19fps — which is about the same variance I see when shooting without a suppressor. It took ten minutes for the suppressor to cool back down below 150F. (Ambient conditions were 62F, 25% humidity. Surface temperature in the sun was 88F. Winds were 10-15mph.)

If I may summarize liberally from the results of the experiment: A baffle suppressor essentially has two states, which we could call “Hot” and “Cold.” A suppressor is Hot when either (1) shots are fired in quick succession or (2) its temperature is above about 150F. In the first case I imagine that the baffles are still full of hot propellant vapor; in the second case the can is radiating enough heat to keep ambient air at this elevated temperature. A suppressor goes Cold as soon as ambient air seeps back in.

Using this equipment (16″ bbl and 6″ suppressor) the muzzle velocity out of a Hot suppressor is around 50fps higher than out of a Cold one. And if we look at the standard deviation of muzzle velocity when shooting Cold it comes out the same as when shooting Hot.