Before You Touch a Gun
By now you should have digested the rules and details of gun safety. However, before you touch a gun you still need to know:
- How can you determine whether it is loaded?
- How can you determine whether its chamber is clear?
- Does it have a manual safety, and if so how does it operate?
You should not handle a gun until you are certain how to answer these three questions. And the first thing you do upon handling a gun should be to check all three conditions. Even among friends you never assume. If you clear a gun and hand it to your friend, he should also clear it. If you take it back you should once again confirm whether it is clear and safe.
Before you fire a gun you need to know a few more things. If your gun and ammo have been provided by a trusted and knowledgeable person these are traditionally taken on faith:
- Is the gun in working order? Every manufacturer specifies function checks to determine that a gun is properly assembled and operating.
- Is the bore clear of obstructions? For many guns the only way to verify this is feed a cleaning rod through the bore or else to open the action and look through the bore — sometimes from the muzzle end. (Just don’t leave the rod in there!)
- Is the ammunition you intend to shoot the correct round for the firearm? And is the provenance of your ammunition sound? Improperly loaded or sabotaged ammunition can destroy a gun and injure or even kill the shooter and bystanders. Such events are extremely rare, but not unheard of.
When You First Touch a Gun
Before you handle a gun find a “home” for your trigger finger that is outside the trigger guard. Whenever you hold the gun ensure that your trigger finger is in the “home” position. When you’re loading, manipulating, clearing, holstering, or doing anything other than firing the trigger finger always stays at home. The only time it goes inside the trigger guard is when the gun is pointed at a safe target and you are prepared to shoot or practice pulling the trigger.
How to Shoot
Your goal in shooting a gun is to send a bullet out the muzzle on a path to hit exactly what you intend. The means of accomplishing this goal are simple:
- Present the gun
- Align the sights with the target
- Pull the trigger without disrupting the sight alignment
Presenting the Gun
Presentation of a gun from a carry position should be practiced separately from firing, and should not be attempted with a loaded gun until an instructor can confirm you are doing it safely. The goal is to make presentations as direct as possible. Things to watch:
- Do not allow the muzzle to sweep any part of your body. In the case of handguns you need to especially practice keeping the support hand clear until the muzzle is certainly in front of it.
- Do not let any finger inside the trigger guard until you have a firing grip on the gun and are on target.
One other instinctive behavior to avoid, even during casual target practice, is pointing the muzzle above the target and then settling down on it. This means that your muzzle is being pointed in an unsafe direction — above the target and backstop. Likewise, the gun and muzzle should never be above your eyes: in a defensive scenario this unnecessarily obstructs your visual awareness and ability to continue assessing the threat.
Sight Alignment
Note that sight alignment only guarantees you’ll hit a target if the gun has been “sighted in.” If the gun does not shoot to its point of aim then either the shooter or the sights need to adjust for that. The process of accurizing and sighting in a gun can get rather complicated. Here we will assume that the gun is both accurate and sighted in.
We will also not delve into the subject of long-range shooting, where one must worry about adjusting sights for different target distances, wind conditions, or ammunition loads.
The particulars of sight alignment depend on the sighting system being used. One general recommendation is to keep both eyes open whenever possible. With point-shooting this is essential, and more generally it is beneficial because closing an eye takes some effort and can actually shut down some of the visual cortex’s helpful functions. However, if you find you are having trouble acquiring a sight picture with both eyes open it is acceptable to close one eye, especially with aperture or scope sights.
Open Sights
 This is the most common sight on handguns. To align these sights: Center the front post in the rear notch. Align the top of the post with the top of the rear notch. The gun will shoot to the top of the front post. When using these sights it is critical that focus be on the front sight when the shot is taken.
Aperture
Common on target rifles: Center the front post or reticle in the rear aperture, then center the front sight on the target before shifting focus to the front sight and taking the shot.
Dot
Red dot sights allow the shooter to focus on the target. The gun will put a hole wherever the dot is. (2017 Update: Evidently some common brand-name red-dot sights suffer from extreme and unexpected parallax. Check yours and know its limits before using it!)
Laser
If a laser sight is bright enough and your grip sure enough that it appears clearly on the target, then all focus is on the target. Note that many lasers are offset from the bore, in which case they should be zeroed parallel to the bore. The point of impact will be offset accordingly, so if bullseye shots are required the shooter has to account for that offset when aligning the laser with the target.
Scope
After a scope is sighted in each shooter needs to ensure that its focus matches his eyesight. If everyone is shooting with corrected vision then the same focus will work. Otherwise the ocular focus needs to be dialed so that the scope reticle appears clearly in the same plane as the scope image.
At that point the shooter merely centers the target in the reticle.
Point-shooting
Point-shooting means that the shooter looks at the target, not the gun. When time is more essential than accuracy — e.g., at very close and imminent threats — you may have to pull the trigger without a sight picture. Practiced shooters can reliably hit man-sized targets out to ten yards without using sights. Trick shooters can pull off remarkable feats of accuracy without using sights.
Point-shooting is also the primary method of sighting shotguns to hit flying targets.
Trigger Control
Trigger control refers to pulling the trigger without disrupting the sight alignment, and following through to make subsequent shots as efficient and accurate as possible.
Once you have the gun aligned on the target just pull the trigger without moving the gun. Sounds straightforward, but it is actually extremely difficult, even before adding in the effects of recoil. That’s why trigger training begins with an unloaded gun, and from there moves to loaded guns with negligible recoil. What follows is an eight-step process to pull a trigger. Again, it doesn’t have to be this complicated, but these details address most errors that people commit during the process:
- Establish a consistent grip on the gun. Consistency is essential, since any variation in how you hold your gun will change the way you apply force to the trigger and make refining your trigger pull impossible.
- Don’t squeeze the grip with your trigger hand: you have to be able to isolate the muscle that contracts your trigger finger in order to avoid pushing shots to your support side. If you want to firm up your grip on the gun squeeze with your support hand using a consistent placement you find comfortable.
- Engage the trigger with the center of the first bone of your trigger finger. Do not pull it with the joint itself, nor with the second bone. If you have large hands arch the trigger finger out to keep contact centered on the first bone.
- Pull the trigger directly backwards with steady, even pressure. Fight any instinct to jerk, yank, or slap the trigger to the rear.
- At some point the trigger will “break,” releasing the hammer or striker and discharging the shot if the gun is live. Whether practicing cold or hot you need to completely disregard this event. Continue pulling the trigger smoothly to the rear until it stops.
- Follow through: Hold the trigger to the rear. Pause. If you are practicing with live ammunition bring the gun back onto the target. If you are dry firing your gun should still be perfectly aligned on target.
- Only now can you begin to slowly release the trigger. At some point in its forward travel you will feel and hear a “reset,” at which point you should pause again: Do not let the trigger go any further forward, because this is where you will begin pulling again if you want to take another shot.
- Do not let go of the trigger until it has completed its forward travel. Only then, if you are done firing, should you move your finger outside of the trigger guard.
Follow through cannot be overemphasized: If you release the trigger before you’re back on target, or if you release it past its reset point, then you are not following through!
Shooting High-Recoil Guns
When a gun is fired it will push backwards and then rotate upwards. The push is referred to as recoil, and the rotation is referred to as “muzzle flip.” Both phenomena cause problems for shooters. Here we will focus on addressing these problems when shooting handguns.
The first line of defense against recoil forces is to minimize how much they move the gun. This is done by optimizing the shooter’s grip on the gun.
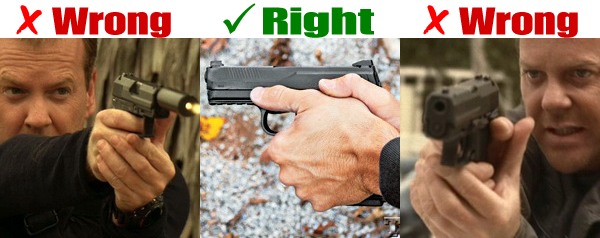
Start by ensuring your grip is as high as possible on the gun. The higher you can get your grip the less muzzle flip you will experience. Almost all autoloaders have at least an indentation just below the slide, and many have pronounced “beaver tails.” Those features are there to encourage you to get a high hold without getting “bitten” by the slide, so push the web of your primary hand snugly up into that recess.
Now find a consistent and comfortable grip for your support hand. Again, the higher, the better. “Teacup” holds do not help with recoil. Look at how champion shooters hold their guns: It’s like they’re trying to swallow the slide with their hands. (You do need to be aware of where the controls are on an autoloader, since a high grip tends to put your thumbs on top of the slide catches, and it can be confusing if you inadvertently trip those when the slide locks back on an empty magazine.)
 |
The key to fighting recoil with both hands is to ensure that there is minimal slack and maximum contact in your grip. (This actually tends to be more of a problem for people with big hands on small grips since they have to cup their hands to keep fingers off the slide.) Carefully inspect your standard firing grip with your finger on the trigger: Are you cupping your hands at all? Is there any space between the grips and your firing or support hand? If so this space can allow the gun to “get a running start” under recoil, and that always results in more perceived recoil.
Note that none of these suggestions involve tightening your grip on the gun, which tends to be counterproductive. Rather, their objective is to transfer as much of the shot’s recoil as directly as possible to your larger muscles and body mass, where it can be absorbed with less drama. If you feel that you need to tighten your grip in order to control the gun do so by pushing with the palm of your primary hand and pulling back with your support hand. This will tighten your hold on the gun but leave your trigger muscles free to do their delicate work without disrupting the point of aim.
Every shooter has to fight the instinct to anticipate recoil during their trigger pull. With handguns it is natural to drop the muzzle as you break the shot in anticipation of muzzle flip. But this must be avoided at all costs! The best way to ensure this isn’t affecting your accuracy is to do live fire drills with random dummy ammo. With revolvers you can put empties in some of the chambers and spin the cylinder before closing it. With autoloaders you can either load dummies at random into the magazines, or have a partner take the gun between each shot and clear the chamber at random. When you break the trigger on a dummy round or empty chamber you should see absolutely no movement! The trigger should be held to the rear, you should not have blinked, and your sight picture should be undisturbed. If you move then keep doing these drills, or step down to a gun with lower recoil until you can break the anticipation habit.
Diagnosing and Correcting Problems
If you are shooting tight groups but they are off center, and a laser boresighter or better shooter confirms your gun is sighted in, the Pistol Correction Chart is helpful for diagnosing consistent errors in accuracy.
However if shot dispersion is high then you need to go back to fundamentals: practice precise sight alignment, focus on the front sight, and a consistent trigger squeeze with follow-through.
Shooter’s Cycle
There are four steps to the tactical application of gunfire. For practice I find it helpful to associate a verbal command with each step, which the shooter should call out to confirm he is following the process:
-
-
- “Draw.” Bring the gun to the ready position with finger off the trigger.
- “Assess.” Focus on a target and determine whether to shoot it.
- “Target.” Bring the gun on target and confirm sight alignment.
- “Trigger.” Put trigger finger on the trigger. For open or aperture sights shift your focus to the front sight: “Front Sight.”
- “Fire.” Take a shot. If you’re competent to double-tap then you can fire twice off that one sight picture.
- Return to step 1.
-
On subsequent iterations of this cycle the assessment step includes asking:
- “Did I hit the target?” Competition shooters practice to “call shots,” — i.e., determine based on their sight picture and trigger pull whether they made a good shot. If you know you messed up the shot you immediately move to the second step to try again.
- “Did I stop the target?” In real life if, after placing two good shots on a person, he is still standing one assumes he might be wearing body armor, in which case the sight picture needs to transition to his head. If the person has moved or fallen you need to lower the gun enough to assess whether the target is still a threat.
“Clear.” Once all known threats have been stopped release the trigger and send the trigger finger home. Do an after-action assessment: Break focus on the target by forcing your head to turn left and right, then scan for other threats. Move to cover if available; reload if possible. If you are done with your gun carefully and deliberately holster it. “All Clear.”
How to Practice
Start with sight picture and sight alignment. On small guns with notch-and-post sights the short sight radius means that you have to be very precise with sight alignment. Don’t tolerate a hair of difference between the vertical alignment of the front and rear sight, or on either side of the front dot. And when you go to break the shot you can’t let the sights move at all. This is something you should do a lot of dry practice with:
- Instantly getting a consistent and proper grip on the gun
- Learning to quickly and precisely align the sights
- Shifting your focus to the front sight without moving
- Squeezing the trigger without moving any muscle not involved in actuating the trigger finger
- Holding the trigger to the rear and not disturbing the sight picture after the trigger breaks
All of the above should be practiced until they can be done quickly and subconsciously.
The only thing you can’t easily dry practice on most guns is the trigger reset. Therefore, once you’re burning real ammo pay attention to this: after a conscious follow-through (i.e., holding the trigger to the rear for a few seconds and not dropping the gun or sight picture) slowly release the trigger only to the reset point.
The other thing you have to watch for during live fire practice is that you don’t develop any adverse reactions to recoil. If you don’t realize the gun is empty and you squeeze the trigger for another shot be sure nothing moves. If it does then stop all other practice until you have run random dummy drills to the point of eliminating any flinch or anticipation. Besides verifying that you have no recoil-induced behaviors random dummy drills are also a good opportunity to practice clearing malfunctions.