Reloading can save you money, particularly on rifle and large-caliber handgun ammunition. You can also produce more accurate rifle ammunition than any factory because:
- Your spent brass is “fire-formed” to perfectly fit your rifle’s chamber
- You can fine-tune your loads to your gun’s unique barrel harmonics
- You can adjust bullet seating depth to your gun’s unique bore
You can build up hot loads that push your gun to the limits of its performance, or you can build extra light or subsonic loads for quiet and easy practice.
I began reloading in 2009 for all of these reasons, and also because I became fascinated by the science of ballistics. Initially reloading can look like an overwhelming hobby. But after a few months of research I compiled a list of equipment and processes that should serve as a good starting point for anybody.
Step 0: Get a C&R License
If you’re reloading to save money, the first thing you should do is get a Curio & Relics (C&R) License, a.k.a. FFL 03, from the BATFE. This allows you to get dealer pricing from MidwayUSA and Graf & Sons, the two best mail-order sources of reloading gear, as well as at Brownells and other popular sources of shooting accessories. Request Form 7CR from the ATF and send it in with the $30 fee. This will pay for itself on the first order you make at dealer prices. And since you will easily spend over a thousand dollars just on initial setup and stocking of your reloading bench the savings will really add up.
Step 1: Buy Equipment
All prices are what I paid (dealer rates) to buy this gear in 2009.
Gear
- Manual: Lyman Reloading Handbook, hardcover. ($25)
- Second Manual: Lee Modern Reloading. This is somewhat specific to Lee’s equipment, and I only recommend it if you end up using a lot of their gear, as I have. It’s inexpensive and has the advantage of listing loads based on volume, not just weight. ($12)
- Press: LEE90064 Lee Classic Turret Press. Even if you never take advantage of the automation afforded by a turret, this is worth the small premium over a comparable single-stage press just because it’s so easy to set your dies once in a turret, and then just lift out turrets when you want to work on a different cartridge. ($80)
- Turret: LEE90269 Lee 4-hole Turret. Buy one turret for each cartridge you want to reload to hold your dies. ($9)
- Turret case: LEE90535 Lee Round Die Box. Buy one for each turret to store and protect your dies. ($3)
- Primer feeder: LEE90997 Lee Safety Primer Feed Combo. ($20)
- Case tumbler: LY7631327 Lyman Turbo Twin Tumbler. ($56)
- Rotary Case/Media Separator: GR17. ($22)
- Primer Pocket Cleaner: LEE90101. ($2)
- Digital Calipers: GR12. ($21)
- Chamfer Tool: LEE90109. ($2)
- Case Trimmer: LEE90899 LEE Zip Trim ($16) or else LEE90110 Lee Trimmer, Cutter, & Lock Stud ($4) and LEE90275 Lee Cutter with Ball Grip ($5) for use with power drills.
- Powder Funnel: LEE90190. ($2)
- Powder Measure: LEE90058 Lee Perfect Powder Measure. ($21)
- Powder Trickler: RCBS05000 #5 Powder Trickler. ($18)
- Balance Scale: RCBS09069 RCBS 5-0-2 ($58).
- Loading Trays: MTM LT150M Large Universal Loading Tray. You need at least two of these. ($6)
If you want to take full advantage of the turret press’s more automated, high-volume loading capacities then you will need to get the following components to automatically dispense powder:
- LEE90429 Lee Pro Auto Disk Powder Measure. ($32)
- LEE90195 Lee Double Disk Kit. ($10)
- LEE90792 Lee Adjustable Charge Bar. ($7)
- LEE90100 Lee Improved Powder Measure Kit. ($8)
For each rifle cartridge you want to reload you will want the caliber specific:
- Lee Deluxe 3-die set. Contains a bullet seating die as well as both full-length and neck-only sizing dies. You only use one or the other of the sizing dies. The advantage of only neck-sizing brass is that you don’t need to lubricate it, and you rarely have to trim it. However, new brass, or brass fired in other guns, has to be full-length sized when first loaded. ($25)
- Lee Factory Crimp Die. ($10)
- Lee Case Length Gauge and ShellHolder. Use to trim case to correct length. ($4)
- Lyman or Wilson Case Length Gauge. Tells you whether you have to trim a case. ($18)
- LEE90194 Lee Rifle Powder Charging Die. For turret loading: Works with either a powder funnel or the AutoDisk Powder Measure to load powder without removing the case from the press. ($9)
For each pistol cartridge you want to reload you will want the caliber-specific Lee Carbide Deluxe 4-Die Set ($34).
Supplies
- Case lube: HRN9991 Hornady One-Shot Case Lube, Aerosol. ($6)
- Cleaning Media: Lyman Turbo Brass Cleaning Media Treated Corn Cob, 6lb easy-pour container. ($13)
- Dryer sheets: You will need to occasionally wipe everything that touches gunpowder to prevent static cling.
- Nitrile gloves and finger cots: You’ll probably prefer keeping your skin out of contact with the primer and powder residue, cleaning compounds, oil, and brass filings that you’ll be handling during the reloading process. Not to mention that skin oil tarnishes brass. (Note that you can often find cots cheaper on eBay.)
- Gun Powder: Hodgdon Varget is the go-to powder for most rifle cartridges, and Titegroup is the standard for pistol cartridges. Unless you have picked out something specific to what you’re loading, start with these powders.
- Primers: Early in 2009 it was basically “buy whatever you can find.” Between Winchester, CCI, or Federal it doesn’t make a big difference. They all price about $30/1000, and another $5-10 for “match-grade,” though unless you’re a benchrest shooter it’s unclear whether that makes a difference. All else equal I buy Winchester primers, primarily because they’re made by the same company as the powders I recommend.
- Bullets: The bullet market seems reasonably efficient, so for standard bullets each manufacturer’s offerings should perform comparably for comparable prices.
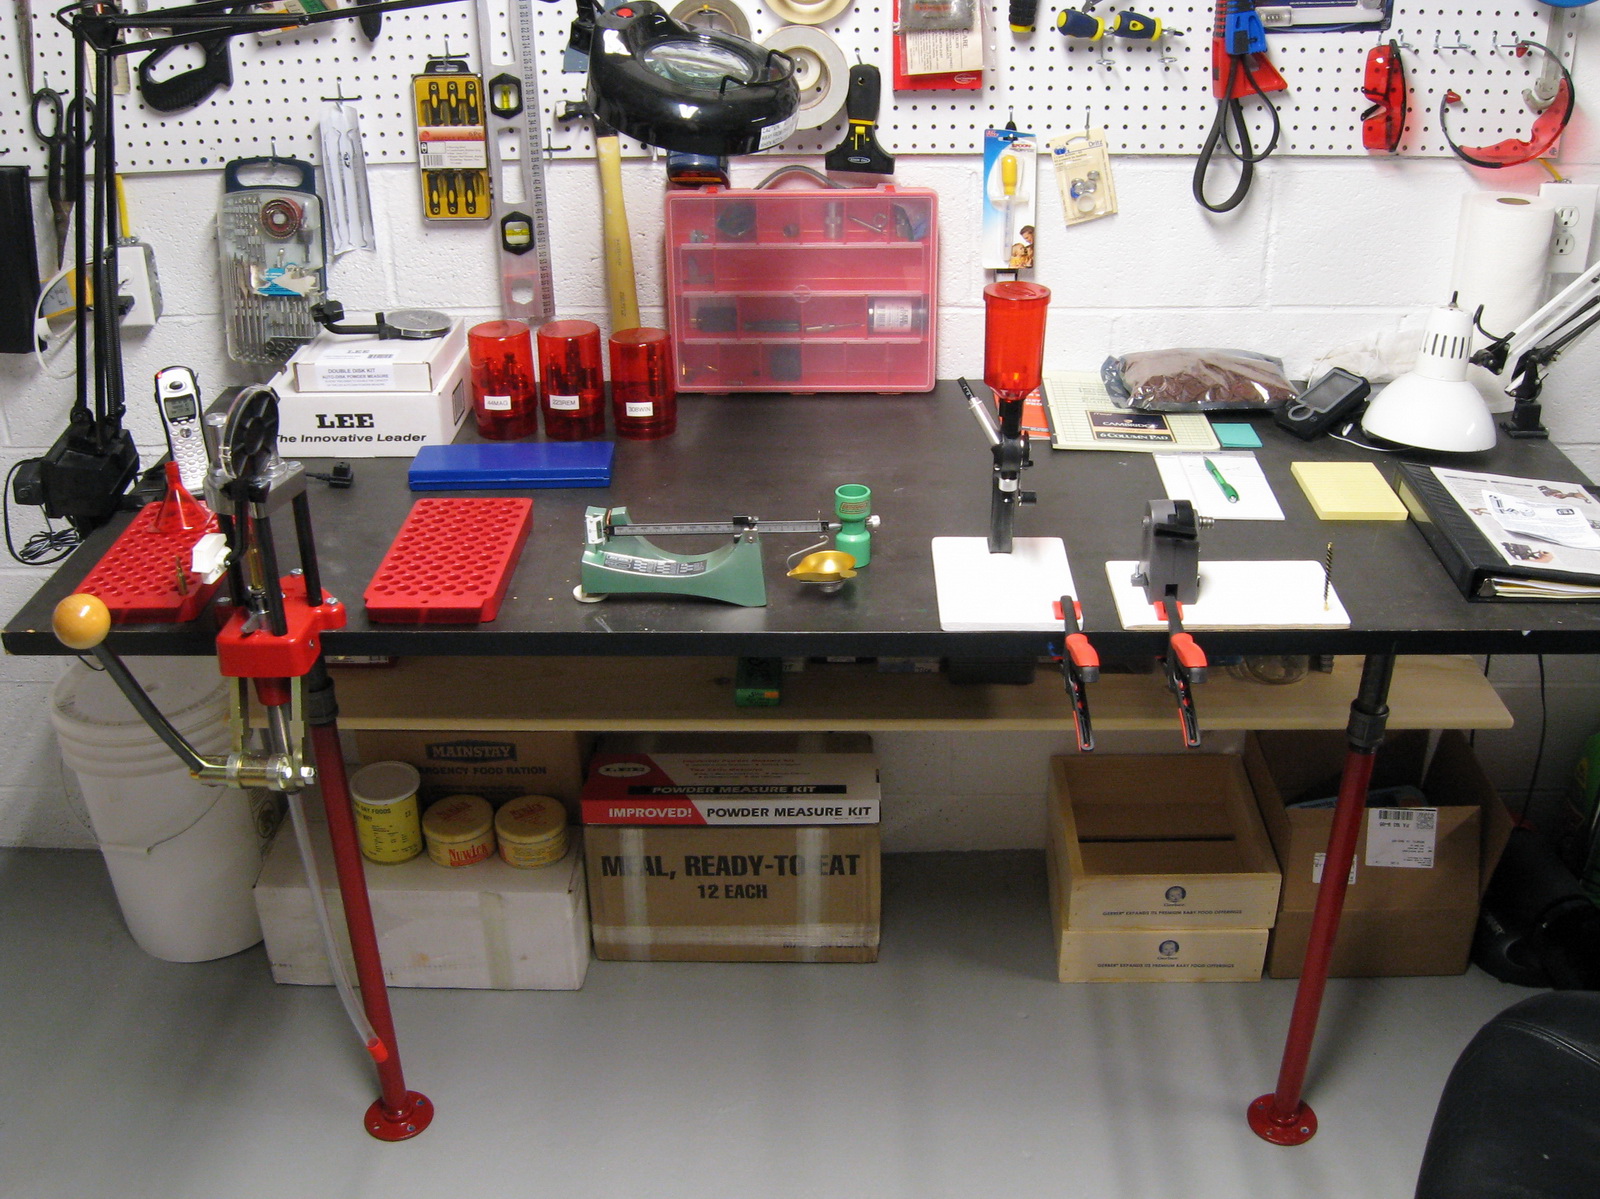
Step 2: Build a Bench
You will want a large bench for your press that will absolutely not budge as you carefully measure out powder and then crank out rounds. Inspired by this article I built one of my own out of a solid wood door screwed onto two pieces of carefully levelled framing lumber: One anchored to a concrete wall, and the other screwed into two iron pipe legs anchored to the concrete floor. It does not move. It’s perfect.
I also cut and painted accessory plates from thin plywood that I can clamp to the edge of the bench when I need to use my powder measure, trimmer, or brushes.
Step 3: Reload
Keep rifle brass segregated by firearm. This allows you to take advantage of the fire-forming to your chamber that occurs the first time the brass is shot in a gun. It also allows you to neck-size only, which reduces wear-and-tear on your brass as well as the need to lubricate and trim your cases.
Prep Brass
- Tumble, Sift, Wipe. Tumble brass in cleaning media until it is as clean and shiny as you like it. You don’t want to put dirty brass through your dies since that can gum or scratch them up. After tumbling, sift the cleaning media out using your rotary separator. Take each case out one at a time, hold it upside down to make sure there is no media or dirt left in it, wipe the outside with a cloth to remove cleaning dust, and then put it in a case or tray in preparation for step 2.
- Brush, Size, Deprime, Clean Primer Pockets. I have a cleaning brush screwed vertically into one of my accessory plates, and before putting a case into my sizing die I twist the neck over the brush. This is a second chance for any debris to fall out, and it wipes away dirt that could scratch not only the neck sizer but also the bullet that’s going in there in the end. Put the case on the press and run it through the sizing die, which will decap the spent primer. If you want your brass really clean at this point you need to take it off the press and scrape the primer pocket clean with a twist of the primer pocket cleaner. (If you happen to be using once-fired military brass on which the primers were crimped you’ll need to re-cut or swage the primer pockets. The best way to do this is with the $90 Dillon Super Swage 600, since it doesn’t remove any brass like cutting/reaming does.)
- Gauge, and if necessary Trim and Debur. You can put your cases into case length gauges at any point to see whether they need trimming. As said before, if you are only neck sizing you will only rarely have to do this. But when they need it, this is the time to do it. After cutting them down be sure to deburr the neck with a few twists of the chamfer tool. You might also want to debur if you haven’t reloaded the case before and the neck is rough, since that could scratch and apply uneven pressure to the bullet. The most demanding benchrest shooters also take measures to uniform their neck thickness at this point, but neck turning requires extra equipment and time, and it has the potential to cause more problems then it solves.
Load
- Prime
- Charge the case with your selected load of powder. Note that the powder type and weight is one of the key variables you get to modify as a reloader that can affect the accuracy and performance of your gun.
- Seat the bullet. Seating depth is a second-order factor in accuracy that you can use to optimize the performance of your gun.
- Crimp the bullet. Some claim that a consistent crimp can increase accuracy over relying on neck tension alone to hold a bullet against the pressure of firing. This is an optional step for low-recoil or single-shot rifles. For any situation where the bullets need to withstand field handling, or where they might be in the magazine or cylinder of a heavy-recoil gun before being shot, crimping is more important. The Lee Factory Crimp Die is the most versatile tool for applying a crimp, and it can even provide an adjustable crimp to bullets that do not have cannelures.
Further Reading
- Lee has instructional videos for their equipment.
- Hodgdon/IMR provides load data online.
- Fr. Frog has excellent pages on ballistics. Start with his page on Developing an Accurate Load.
- Dan Newberry has a good breakdown of reloading gear by Necessary, Nice, Unnecessary.
- The High Road’s Equipment Basics thread.
- Illustrated step-by-step instructions at this SniperCentral thread.
- David Wilson has several good illustrated articles on load development and reloading
Sinclair produced this online video series on reloading.
Alternative: If you want to crank out more rounds in less time you need to step up to a progressive press. It’s more expensive and complicated than a turret, but if that doesn’t deter you then buy the Hornady Lock-n-Load AP press — currently $370. You’ll also need a $30 Shell Holder for each cartridge base type you want to reload.
Pingback: The Time Cost of Reloading | EmptorMaven